PORTRAIT
- REPLACE HALF-CLOSED EYES
with PhotoFiltre Studio software 
Perhaps, it happens that you take some group photos,
or a solo portrait on a well appreciated background,
and you realize with horror that one or more characters
had shut one's eyes tight.
Fortunately you have been far-sighted, and thought about doubling the catch,
or you have the chance to get a portrait of the same person,
in another context with a different background,
but with a lighting and an attitude quite close to the picture you want to enhance.
What to do? ... Duplicating the eyes?
Usually the result is not very natural, except in the case of people wearing glasses, read the topic
- because the size, orientation and position of the eyes are somewhat difficult to accord.
- because the expression of the eyes must be in compliance with the expression of the rest of the face :
wide open eyes did not match with a laughing mouth, for example..
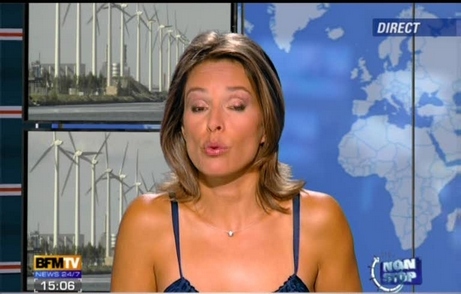
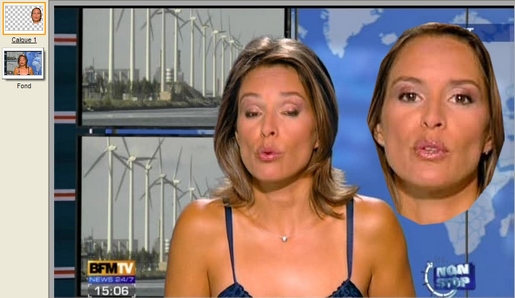
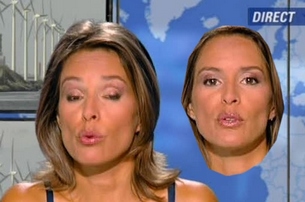
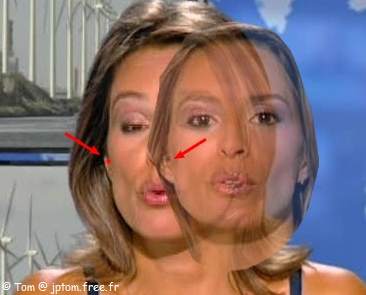
Well, I fairly like the background of the photo on the left and I will try to replace the face
of the anchorwoman, for the one of the right photo, which is much more to his advantage.

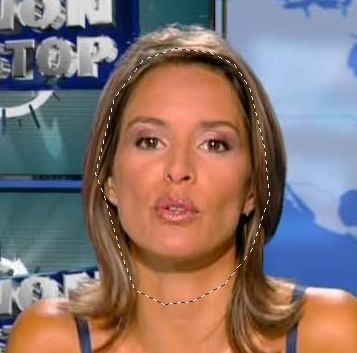
1° Fast clipping the face
Click on the images above to enlarge and save them on your computer,
then, Open both images in PhotoFiltre.
Zoom on the right image : 
Enable Lasso selection tool, or better, the Polygon tool in the palette of tools : 
Wrap around the face, runing rapidly in the hair, and follow generally the contour of the lower jaw,
from the bottom of the ears attachement.
Singularity of this picture : the shadow under the chin is quite different from the original.
Therefore, it would be better to go bellow, following the contour of the neck, to facilitate the later connection.
Given the length hair, we can go down without following the contours side of the neck.
2° Copy selection and Paste on the target image
Do a Right click in the selection and Copy.
Enable the target image, by clicking on it or by selecting it in the Window menu.
Right click in the target image, and Paste.
Holding down left-click, on the face which has been pasted, move to the right, next to the original side.
You can see in your layers bar, left, the active Layer 1 thumbnail, which was created by pasting.
3° Correct orientation of the pasted face
Right click the Layer 1 thumbnail, Transform free... ,
In Rotation, adjust the Angle value : here : -4°
The Direct preview allows to estimate the best compromise between the adjustment of the nose line and eye line.
Validate without changing the other settings.
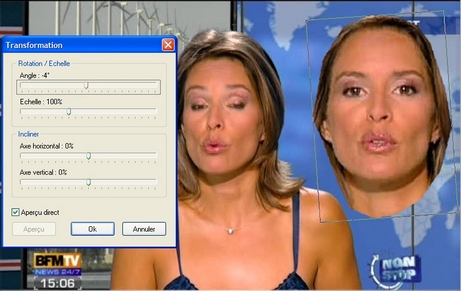
Clearly, the size of two faces is not the same, but the setting of the scale,
in this particular case, is likely to be long and rough, even if you can use the tool View / Show grid.
We can quite simply collect specific measures,
and perform a small calculation to get the right size.
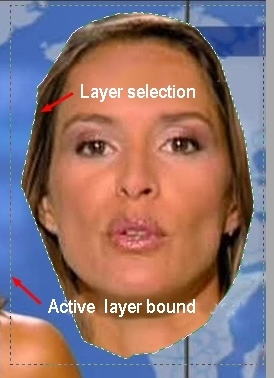
4° Crop Layer 1
The Layer 1, being subjected to a rotation, its size has been enlarged.
(You can verify this by checking Show active layer bounds in the Preferences, Other tab.)
In the Selection menu, Select layer or make [Shift + Ctrl + A]
We see that the selection perfectly follows the contour of the face.
(but does not coincide with the bounds of the active layer)
Right click in the selection, Crop layer.
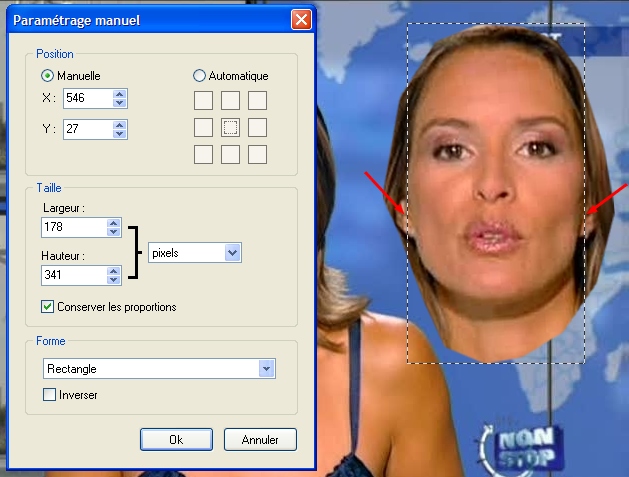
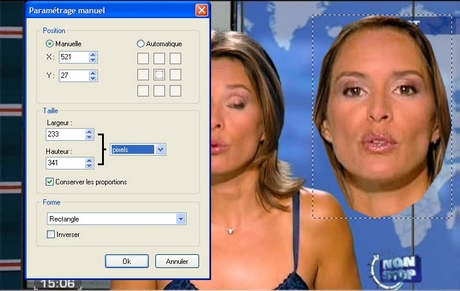
5° Measuring size of Layer 1
In Selection menu, Select layer or make [Shift + Ctrl + A]
Right click in the selection, Set shape, Rectangle.
Do a right click again in the selection, Manual settings.
Collect pixel size of Width and Height on Layer 1. Here : W = 233, H = 341
Click Cancel, because we only need to read these values.
To compare the sizes of two faces, we will identify their common marks.
Generally, the most opposite points and easy to identify, with sufficient accuracy, are located on ears.
6° Measuring width between the marks of Layer 1
Place the mouse pointer on the left side of the selection.
Holding down left-click, move and place it precisely on the chosen mark.
Do the same for the right side.
Right click in the selection, Manual settings.
Collect pixel size of the Width between the marks of Layer 1. Here : W = 178
Click Cancel, because we only need to read these values.
Click on the image to enlarge :

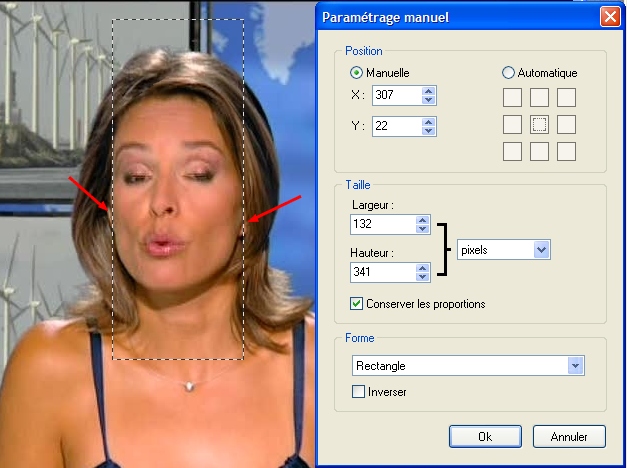
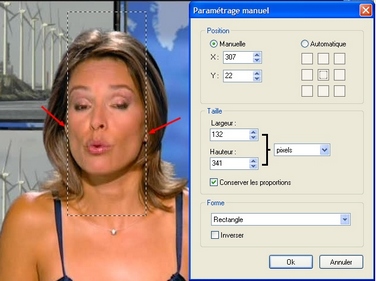
7° Measuring width between the marks of the background layer
Holding down left-click in the selection, move it on the left face.
Proceed as in item 6, to adjust the vertical edges of the selection on the common marks.
Right click in the selection, Manual settings.
Collect pixel size of the Width between the marks of the background layer. Here : W = 132
Click Cancel, because we only need to read these values.
Click on the image to enlarge :
8° Size calculation to be applied to Layer 1
A little board replacing many speeches, you can find below measures noted above,
as well as the formulas copied out in column D
The width to be applied to Layer 1 will so be 173 pixels.

9° Changing size of Layer 1
Right click on Layer 1 thumbnail, in layers bar on the left,
Manual settings. Enter Width calculated value. Here : 173
We can check that the proportional height obtained corresponds to the value of the board. Here : 253
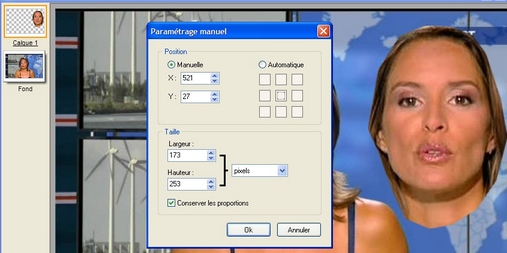
Click OK to validate
10° Place Layer 1 functions of the marks
Feel free to zoom in for more comfort and precision.
In the layers bar on left, left click on the Background layer, to activate it.
In the color palette, select a bright red color as foreground
Enable Paintbrush tool with a diameter of 3, and put a point on the mark in the ear of the background face.
.
Close the red pen  clicking Selection Tool :
Left-click the Layer 1 thumbnail to enable the layer
Left-click Layer manager tool :  or press W
In the Layer 1 properties, which appeared under the Layer manager tool,
adjust layer opacity to 65%.
Left-click on Layer 1 or on its thumbnail to enable displacement functions.
Holding down Shift key, move Layer 1 by using the arrow keys,
to square the red dot with the corresponding mark of Layer 1.
When the position is satisfactory, restore opacity of Layer 1 to 100%.
The red spot has disappeared, but it remains to fade contours.
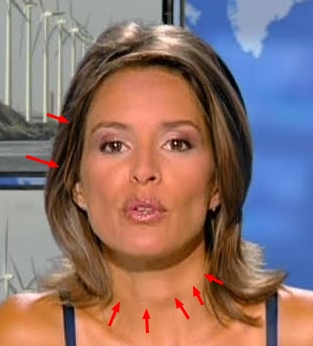
11° Last coatings
Before anything else, adjust gammas on Layer 1, menu Adjust / Gamma correct...,
to blend shades of joins, especially in the neck.
Refine, as necessary, with the function : menu Edit / Fade or Shift + Ctrl + Z
To fade rapidly layer contours : menu Layer / Border effect / Progressive contour
it's magic !!!
While it is still necessary, use the Erase tool, on the edges of the layer,
with a diameter of 30 or 50 and a pressure of 2 or 3, to blend the joins which could remain visible.
.
Alternative : merge all layers and use the Smudge tool with a large radius and low pressure.
12° It's finished 
I hope that the person we wanted to emphasize, will not see any offense
in the loan, respectful, of his public image, for teaching and graceful purposes.
Thanks also to Antonio Da Cruz, the generous and talented designer for PhotoFiltre.

We request your leniency for this attempt of translation.
In spite of our care to verify each term, surely we have done some improper lexical or syntactical translation.
Any report to improve this task is welcome. Contact
(Remove any superfluous character placed in the adress to elude spam robots)