To create animated pictures
![]()
Updated 2008/10/10 for 9.2.2 PFStudio release
Use
Animated GIF module enables you to create animations of animated GIF type, by using the internal management of the layers of PhotoFiltre Studio.

Properties of animated GIF module
Principle of the animated GIF
The animated GIF consists of images placed one following the other and which give an animation effect thanks to retinal persistence. The image is also called of the name of frame. Each image is displayed for one given period of time which is named delay.
In PhotoFiltre Studio, the various images composing animation are the layers.
Constitution of the animated GIF
The preliminary work is of primary importance, because you have to organize the layers according to the animation type which you want to get. For example, to get a transparent animated GIF, you must first define the transparency of each layer.
To start, you have to open an image (made up of one or several layers) or to create a new document as a background. The background will determine the size of the animated GIF.
Then, to simulate animation, you have to create as many layers as necessary, on the basis of the background and piling up them. The order of stacking will determine the order of the images to animate. You must know that the background will not constitute a GIF frame, but will be used only as support. According to the selected options, PhotoFiltre Studio can need to merge a layer with the background or that which is lower to him to compose animation.
For this type of work, you can refer to the various chapters related to the layers.
The number of images is unlimited, but it depends upon your operating system and available memory of your computer.
Generation of the animated GIF
To generate the animated GIF, you must use the menu [Tools> animated GIF]. This control remains grayed if there is no image present on the workspace. At least two layers are needed (a background layer and another layer), if not, PhotoFiltre Studio returns an error.
When an animated GIF is generated, all the layers are consider by the module, even those which are hidden.
• [Delay] option
This option consists of two interdependent parameters. It enables to assign to the images a time display in hundredth of second. This duration indicates that the image will be visible during the time mentioned before passing to the following one. By default, the values are of 100/100 th of second (equivalent at one second).
The durations are preserved during all the session of PhotoFiltre Studio as long as the number of layers composing the GIF does not vary too much.
In the drop-down list of right-hand side, you will find a hierarchy corresponding to that of the layers bar. The list is given as follows :
1. All images
2. Name of the first layer
3. Name of the following layer and idem until the end
To define one uniform delay for all the images, select [All images] in the list. To define one delay for a precise image, select the name of the layer corresponding in the list.
• [Loop] option
This option enables to perpetually repeat the animated GIF. By default, the box is checked.
• [Diffusion] option
This option enables to apply an algorithm improving visual quality of the image at the moment when the number of colors is reduced. By default, the box is checked.
• [Restore background] option
This option enables automatically to insert the background layer between each image. A constant background can thus be simulated in animation.
• [Crop transparent borders] option
This option enables to cut down the transparent edges on layers of lower sizes than those of the background.
• [Web 216 colors] option
This option enables to use a pallet of 216 colors improved for the Web. In this case, PhotoFiltre Studio creates a constant pallet for each image composing animation. The result is of worse quality, but it offers a greater compatibility with the other applications. By default, this option is selected. .
• [Optimized palett] option
This option enables to calculate optimized pallets of 256 colors. In this case, PhotoFiltre Studio uses different colors for each image composing animation. The result is of better quality, but incompatible with some applications.
• [Transparency] option
This option enables create GIF animated entirely transparent. In this case, each layer corresponds to an image composing animation. The transparency is taken on that of the layer, but the opacity of the layer is ignored. You must well understand that this option acts only on the generated GIF, but does not modify the layers transparency at all.
• [Preview] button
PhotoFiltre Studio opens a window of your Internet navigator to display a preview of the animated GIF. In case of transparent GIF, a checkerboard background is visible for better visualizing the transparency.
• [Export] button
It launches the standard Windows dialog box allowing the recording with GIF like single type of file.
Creation of a diaporama
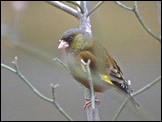
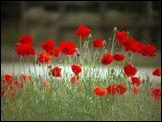
This type of animated GIF is simplest to realize, because it consists of an images series of same sizes. Here, the preparatory phase is important, because you have to prepare an images series of the same size in width and height. In our example, we will use the three images below.


1. Open the first image in PhotoFiltre Studio
2. Insert a new blank background to prevent that the first image would be ignored in animation. Use the control [Layer > Insert new background].
3. Open the other images as layer. Repeat the operation, as many times there are images to insert. Use the control [Layer > New > Open as layer].
4. You can now generate the animated GIF by using the following options :
- Delay of 100/100 for all the images
- Loop
- Optimized palett (this option is advised in spite of compatibility problems)
- Diffusion
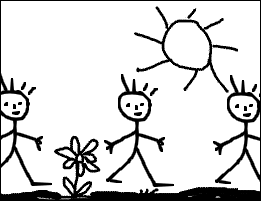
March of chaps (with an opaque and constant background)
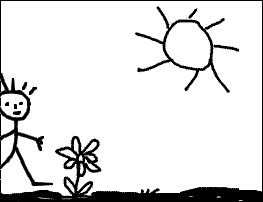
We need the two following images. Note that the layer is opaque whereas the chap is in transparent mode.

The left image is used as background, the
right image is used to generate the layers.
1. Start by opening in PhotoFiltre Studio, the background image.
2. Open as layer the chap image. Use the control [Layer > New > Open as layer].
3. Twice duplicate the chap layer by the control [Layer > Duplicate]
4. Move the layers in order to have one in the center, one left side and another right side.After these operations, you should get a multilayers image, looking like the screen printing below.
5. Generate the animated GIF by using the following options :
- Delay of 40/100 for all the images
- Loop
- Restore background
- Web 216 colors
Creation of a counter (in transparent mode)
1. Launch PhotoFiltre Studio and create a new image of 150x150 pixels. You can leave the white background, because this one will be ignored in animation.
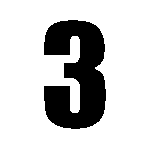
2. Insert a new text with the figure “3” (font Impact, size 100, Color black, Antialias). Leave the new layer to the center of the image.
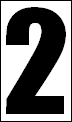
3. Select the layer in top of the pile and mask it. Insert a new text with the figure “2” by using the same parameters of font as previously. Leave the new layer to the center of the image.
4. Select the layer in top of the pile and mask it. Insert a new text with the figure “1” by using the same parameters of font as previously. Leave the new layer to the center of the image.
5. Select the layer in top of the pile and mask it. Insert a new text with the figure “0” by using the same parameters of font as previously. Leave the new layer to the center of the image.
6. Select the layer in top of the pile and mask it. Insert a new text with the text “Go” by using the same parameters of font as previously. Leave the new layer to the center of the image.
After these operations, you should get the layers below.


7. Generate the animated GIF by using the following options :
- Delay of 50/100 for all the images, then 100/100 for the last
- Loop
- Transparency
- Web 216 colors
- Diffusion

Blending of images
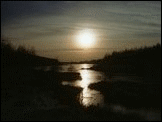
To carry out a blending, we need two images of identical width and height. In our example, we will use the two images below.
1. Open the first image in PhotoFiltre Studio
2. Insert a new blank background to prevent that the first image would be ignored in animation. Use the control [Layer > Insert new background].
3. Open the second image as a layer. Use the control [Layer > New > Open as layer].
4. Twice duplicate the layer of the second image by the control [Layer > Duplicate]. You should get three occurrences of the second image.
5. Apply an opacity of 30% to the layer number 2 (first occurrence of the second image)
6. Apply an opacity of 50% to the layer number 3 (second occurrence of the second image).
After these operations, you should get the multilayers image following :
Blank background
Layer 1 = Image 1, opacity 100%
Layer 2 = Image 2, opacity 30%
Layer 3 = Image 2, opacity 50%
Layer 4 = Image 2, opacity 100%
7. Generate the animated GIF by using the following options :
- Delay of 30/100 for all the images
- Loop
- Optimized palett (this option is advised in spite of compatibility problems)
- Diffusion
Rising image
To carry out this effect we need only one image. We also will use the principle of layers blending.
1. Open the above image in PhotoFiltre Studio. It will be used as support (background)
2. Try to reproduce the following multilayers image. The layers are described upwards.
Background = image above
Layer 1 = Color layer, white, 100% (1)
Layer 2 = Color layer, white, 75%
Layer 3 = Color layer, white, 50%
Layer 4 = Color layer, white, 25%
Layer 5 = Blank layer, entirely transparent (2)
Layer 6 = Color layer, white, 25%
Layer 7 = Color layer, white, 50%
Layer 8 = Color layer, white, 75%
(1) To create a new layer of Color type, use menu [Layer > New > Color]. Select white color and modify opacity.
(2) To generate an entirely transparent layer, use menu [Layer > New > Blank]. In the New window settings, chex the box Automatic transparency
3. Generate the animated GIF by using the following options :
- Delay of 20/100 for all the images, 100/100 for the layer 1 and the layer 5
- Loop
- Restore background
- Optimized palett (this option is advised in spite of compatibility problems)
- Diffusion
